Stay up-to-date with Node.js packages using npm-onupdate service

npm-onupdate-logoSome of you may know that I’ve been recently doing a lot of development using Node.js. One of my first creations that I’m really proud of (and one that is out there in the wild being used by my employer, Adobe) is the EventQs service. Of course when building EventQs I used several third-party packages (Node.js libs) starting with the Express framework and including libs like Moment.js for date manipulation. All of these are available through the npmjs.org registry, which is an essential element of Node development. One of the things I missed with the npmjs.org was some way to get notified when packages that I use are updated. I wanted to receive notifications without having to remember to periodically run commands like npm update or use the very helpful npm-police tool.

What I wanted were email notifications, which I could get even when I was asleep 😉 That is why I created this very simple service called npm-onupdate that is available here. Essentially it’s an NPM registry email notifications service that enables its users to stay up-to-date with the packages used in their Node.js projects. When an npm package is updated in the registry, users will receive an email message about it. Both the CLI tool and the server side code are open source and available on GitHub here and here (pull requests are welcome of course). For now the service is hosted on the OpenShift PaaS by Red Hat, with a single gear for a MongoDB and a two gear cluster for the Node.js app. Hopefully this will be enough to handle the load, at least for some time 😉

The main way of interacting with the npm-onupdate.info service is by using the npm-onupdate CLI tool, which is available from npmjs.org of course. Below is a list of commands that will get you up and running quickly. Please keep in mind that this is a beta release so things may not work as expected. If you happen to find any bugs or you have any feedback please report these through the issues page on GitHub. (The commands below use the express and ejs packages as examples.)

Installation
$ npm install -g npm-onupdate

Adding new package alert
$ npm-onupdate add express

Adding multiple package alerts
$ npm-onupdate add 'express ejs'

Adding alerts for all dependencies from package.info file in current dir
$ npm-onupdate add

Removing package alert
$ npm-onupdate rm express

Removing multiple package alerts
$ npm-onupdate rm 'express ejs'

Listing all registered alerts
$ npm-onupdate ls

Get account info
$ npm-onupdate account info

Change account password
$ npm-onupdate account password

Delete account
$ npm-onupdate account delete

Logout
$ npm-onupdate account logout

CSS3 vw & vh units, parallax video, ema cc => scroll2play

Some time ago I stumbled on this very nice parallax site of the new Mercedes A-Class. I really liked the effect of playing video while scrolling the browser window. This has inspired me to create a simple and lightweight library that could do something similar. That is why I brought to life scroll2play – a JavaScript lib that mimics video playback while scrolling your browser window.

You can see it in action on its demo page or by scrolling over the iframe below:


While building scroll2play I experimented with a few really fresh features of modern web browsers. The first are viewport relative units of measure vw & vh which allowed me to scale loaded image widths and heights to the size of the viewport. The second is the window.URL.createObjectURL function which creates a URL that is a reference to locally cached blob. In my case blobs were images loaded using XMLHttpRequest. I encourage you to learn more about these new cool features.

Lastly to export a sequence of still images out of my video content I used Adobe Media Encoder CC. You can learn how this can be done by watching my short video tutorial below:


BTW: Below is the complete footage of my friends and me riding on wakeboards 😉

Experimenting with MySQL connections and Node/Express

Over the weekend I was experimenting with a setup of MySQL connections in the Node/Express web app that I’m working on. It led me to create this super simple middleware module express-myconnection that provides a consistent API for MySQL connections during the request/response life cycle. It supports three different strategies of managing db connections: single for a singleton connection on an app instance level, pool based connections, and a new connection per each request. It’s also capable of auto releasing/closing connections if configured with either the pool or request strategy.

The conclusion of my experiments is that for now I will stick with a single. I believe this should work just fine when you think about the single-threaded nature of node. If I experience any issues switching to pool based or connections per request will be matter of setting single flag in my app configuration.

Below you can find some more info about the different strategies and how you can use them in your own projects.

Strategies

  • single – creates a single database connection for the whole application instance. The connection is never closed. In case of a disconnection, it will try to reconnect again as described in the node-mysql docs.
  • pool – creates pool of connections on an app instance level, and serves a single connection from the pool per request. The connection is auto released to the pool at the response end.
  • request – creates new connection per each request, and automatically closes it at the response end.

Usage

Configuration is straightforward and you use it as any other middleware. The first param it accepts is a node-mysql module, second is a db options hash passed to the node-mysql module when the connection or pool is created. The third is a string defining the strategy type.

express-myconnection extends request object with the getConection(callback) function this way the connection instance can be accessed anywhere in routers during the request/response life cycle:

CSS Regions in Adobe Edge Reflow

I just found out about this new and really hot release of Edge Reflow CC. It offers a really cool new feature: CSS Regions support. I got so excited about it that five minutes later I recorded this quick and dirty overview that goes through how you can get started with it 😉

If you want to learn more about CSS Regions or this new Reflow release, just follow these links:

Navigation Drawer Pattern With Topcoat CSS Library

Recently I have been playing around with the Topcoat library. Essentially Topcoat is a set of pure CSS-based components for building high performance HTML applications. These apps can be either hosted HTML web apps or native apps packaged with PhoneGap/Cordova. In the app that I’m currently working on I wanted to have a slideable navigation bar that follows the so-called Drawer or Off Canvas UI pattern. Topcoat itself doesn’t come with a built-in implementation of it but all the necessary components are there, so it was just a matter of few lines of CSS and JavaScript to have it running beautifully. In my implementation I also used a simple media query for high-resolution screens like on tablets or desktops where slideable navigation is not necessary. Continue reading

Video Series – Getting Started With Reflow

As you probably know already, Adobe has just released a preview version of Edge Reflow CC. Just for this occasion, I recorded a series of five video tutorials that will guide you through your first steps with this awesome tool. You can watch the whole series in the embedded player below or you can view each video using the following links:

  1. Intro – This is the introductory episode of the Getting Started With Reflow video tutorial series. It briefly covers the basics of Adobe Edge Reflow as well as navigation within the tool.
  2. Defining Layout – This episode covers the first steps of the Getting Started with Reflow tutorial series. It shows how to use Reflow to define layout of your responsive design.
  3. Styling Elements – This is the third episode of the Getting Started with Reflow video tutorial series. It goes over the styling capabilities of Adobe Edge Reflow.
  4. Making Layout Responsive – This is the fourth episode of the Getting Started with Reflow video tutorial series. It covers an essential part of Reflow — making your layout responsive.
  5. Testing Layout – This is the final episode of the Getting Started with Reflow video tutorial series. It covers techniques for testing your design on different devices using Edge Inspect and Responsive Inspector tools.

Chrome Extension + Retina + captureVisibleTab + translate3d = 2 x res

As you may know, recently I’ve been dealing with Chrome Extensions and their APIs quite a bit. This is because I’ve been working on my Responsive Inspector tool. (If you haven’t seen it yet and you are into Responsive Web Designs I recommend you check it out!) Overall I had a great experience with the Chrome Extensions API, except for just one function that really gave me a hard time. This function is captureVisibleTab, which is a key to whole page screen shots feature that I implemented in Responsive Inspector.

The issue I experienced with it was that on some sites the captured screen shots had double the normal resolution. This was only happening on my MacBook with Retina display, and not on every site. On the sites that had this issue, I started isolating the problem element by element and I discovered that the root cause was a translate3d transformation. To work around this problem I included a div element with transform: translate3d(0,0,0) in a page that embeds in an iframe the captured site so that every screen shot had doubled resolution no matter if it used translate3d or not.

Next I called canvasContext.scale(1/window.devicePixelRatio, 1/window.devicePixelRatio) on the Canvas Context that I drew captured image into. This scaled screen shot to proper resolution, and the latest version of Responsive Inspector (now available in Chrome Web Store) runs like a charm on Retina MacBooks :)

Responsive Inspector (beta) released!

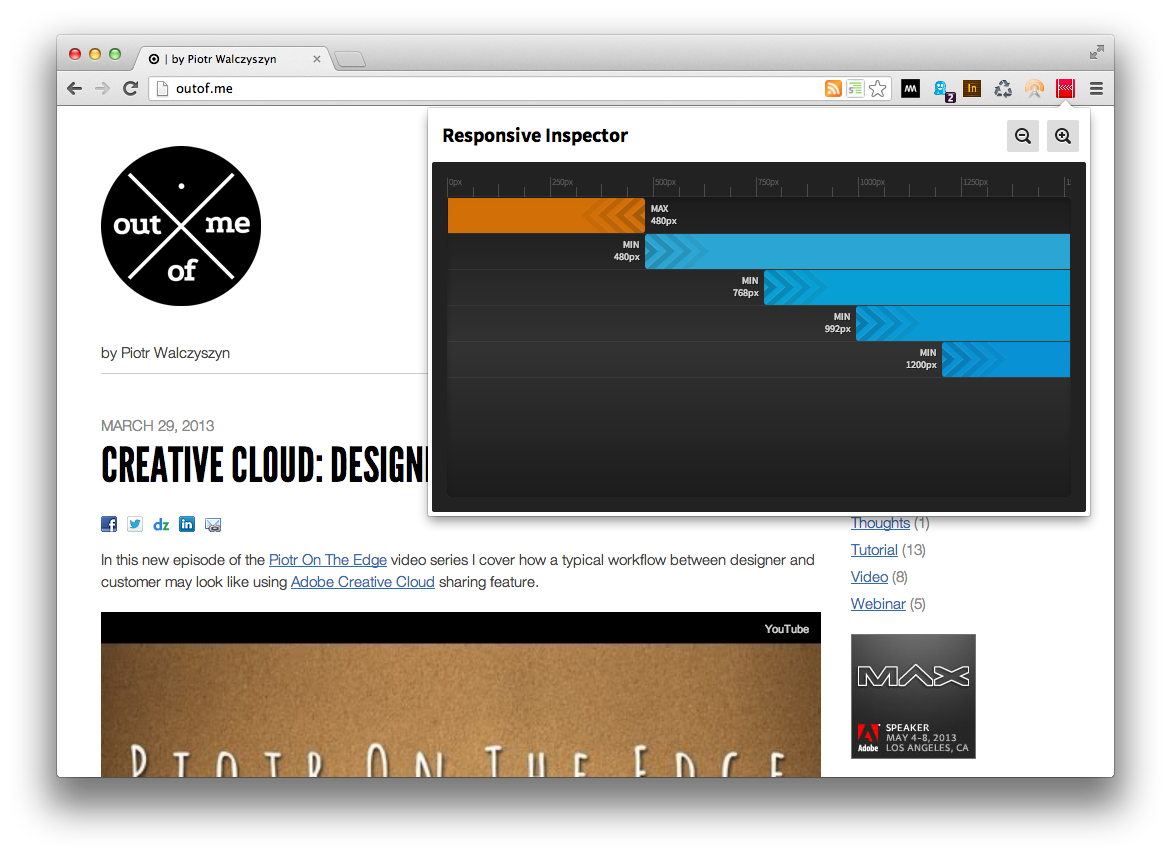
Responsive Inspector logoI’m really proud to announce a beta release of Responsive Inspector extension for the Google Chrome browser. It’s a little side project that I’ve been working on together with Filip Łysyszyn – a colleague from Adobe and a great UI/UX designer. In a nutshell, Responsive Inspector allows viewing defined media queries of visited websites. It is very useful when developing responsive web layouts as it can show what min-width or max-width media queries are specified in CSS stylesheets. In addition it also enables pixel perfect browser resizing, taking and saving whole page screenshots, CSS media query code viewing, and sharing web designs on Behance service as Work In Progress.

You can find it here in the Chrome Web Store. Remember it is a beta release, so if you find any bugs or you would like to share your feedback with us you can use this contact form. Below you will find a screen shot of Responsive Inspector in action and a short video with an overview of all of its features.

Responsive Inspector screen shot

Edge Animate – DPS Integration

In this new episode of the Piotr On The Edge video series I demonstrate how you can integrate HTML5 animations built using Adobe Edge Animate with DPS-based (Digital Publishing Suite) magazines.

The following topics are covered:

  • A quick intro to Edge Animate
  • Adding DPS navigable links in Animate – using navto:// technique
  • Publishing animations for DPS
  • Placing animation in InDesign/DPS
  • Previewing the article on a device using Adobe Content Viewer